For most bird photographers, the best monopod is a carbon fiber model rated for at least 8 kg of payload, standing at least 160 cm tall, paired with either a gimbal head (for birds in flight) or a two-way tilt head (for perched birds). If you want a single strong starting pick, the Leofoto MPQ-405C is hard to beat for the money: it's lightweight, reaches 72.8 inches, handles heavy telephoto loads, and works with the Arca-Swiss system that most modern heads use. But the right monopod really depends on how and where you shoot, and I'll walk you through exactly how to choose.
Best Monopod for Bird Photography: Buyer Guide & Picks

Marcus Chen
27 Apr 2026
What a monopod actually does for bird photography (and when it beats a tripod)
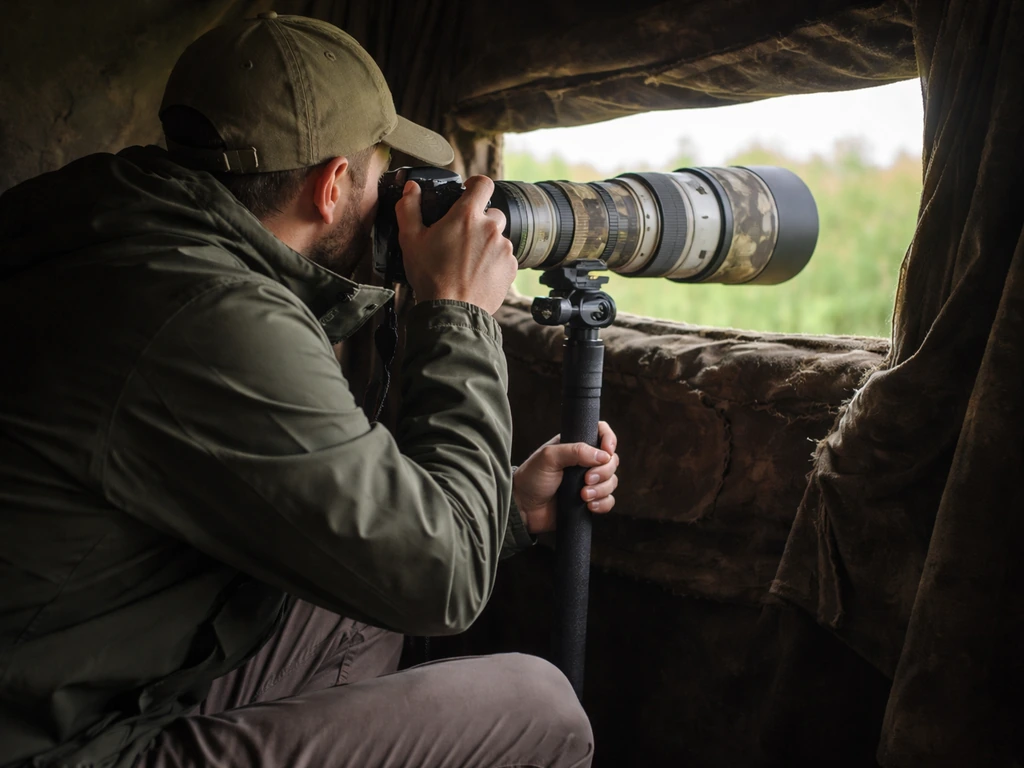
A monopod sits right between shooting handheld and using a full tripod. It's one leg: you still have to balance the camera yourself, but the pole takes the weight off your arms and dramatically cuts down on shake from fatigue, especially with a big telephoto lens like a 500mm or 600mm. When you're standing in a marsh for two hours trying to track herons, that difference is huge.
Here's where a monopod genuinely beats a tripod: speed and mobility. You can swing a monopod onto a bird crossing the frame in about a second. A tripod takes ten seconds minimum to reposition. If you're following a kingfisher that never sits still or panning across a mixed flock, a tripod will cost you the shot. A monopod lets you move with the bird.
That said, I'll be honest about the tradeoff: a monopod is a compromise. For truly deliberate, maximum-stability compositions, like shooting through a hide at a nest site or waiting for a specific bird to return to a perch, a tripod still wins. Many experienced bird photographers skip monopods entirely for that kind of work. The monopod earns its place in dynamic, mobile fieldwork, not in patient hide sessions where you're waiting for the perfect frame and every millimeter of stability counts.
The features that actually matter when you're buying
Height
Usable maximum height matters a lot. You want a monopod that reaches at least eye level when you're standing so you're not hunching over. The Gitzo GM4552L hits 190 cm (74.8 in), which is tall enough for most people even with a bird at a slight elevation. The Leofoto MPQ-405C reaches 72.8 in. Minimum height matters too if you're shooting ground-nesting birds or from a seated blind; the Sirui SVM-145P goes down to 77 cm (30.3 in), which is genuinely useful for low-angle work.
Weight and build material
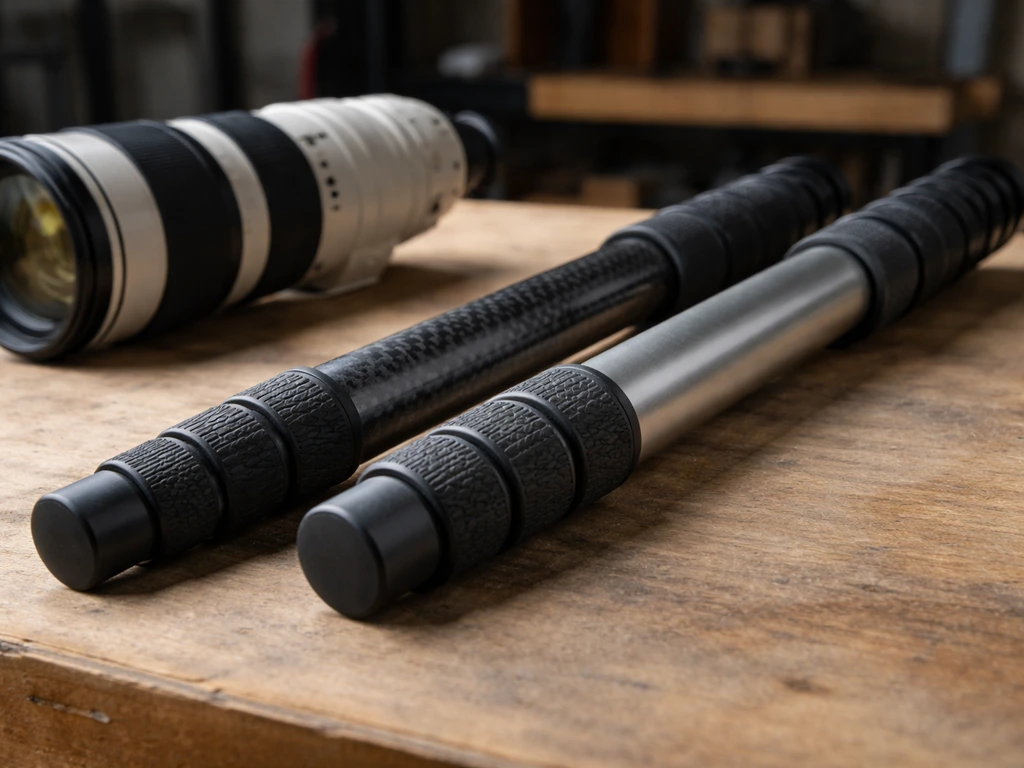
Carbon fiber is worth it here. You're carrying this thing all day, often with a heavy lens already attached. Aluminum monopods are cheaper but noticeably heavier by day three of a birding trip. Carbon fiber also damps vibration slightly better, which helps with sharpness.
Maximum payload
This is the one beginners most often underestimate. Always add up your camera body, lens, and head weight together, and then choose a monopod rated for more. A Sony A1 with a 600mm f/4 can easily hit 5 kg or more. The Sirui SVM-145P is rated to 10 kg (22 lbs). The Leofoto VH-20 head alone handles 12 kg. Going under the rated load is how you get a monopod that flexes and wobbles under a heavy rig.
Center column behavior
Avoid extending a center column if your monopod has one. Every inch of center column extension reduces stability significantly. This isn't just a theoretical concern: it shows up as blurry shots with long lenses. Use the leg sections to get to height and leave the center column locked down.
Leg and foot design
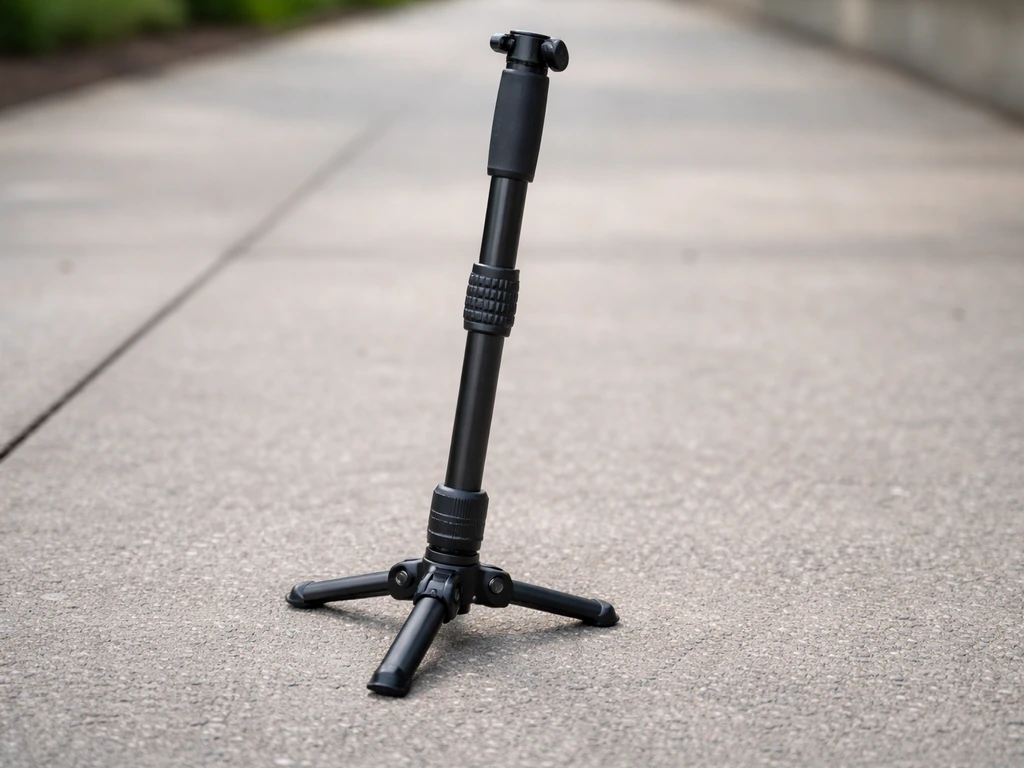
Some monopods, like the Sirui SVM-145, have three tiny foldable feet at the base that let the column tilt up to 36 degrees in any direction. This is a genuine field advantage: you can lean the monopod at an angle while tracking a bird banking overhead, and it won't just tip over. A plain rubber foot is simpler but less versatile.
Head type
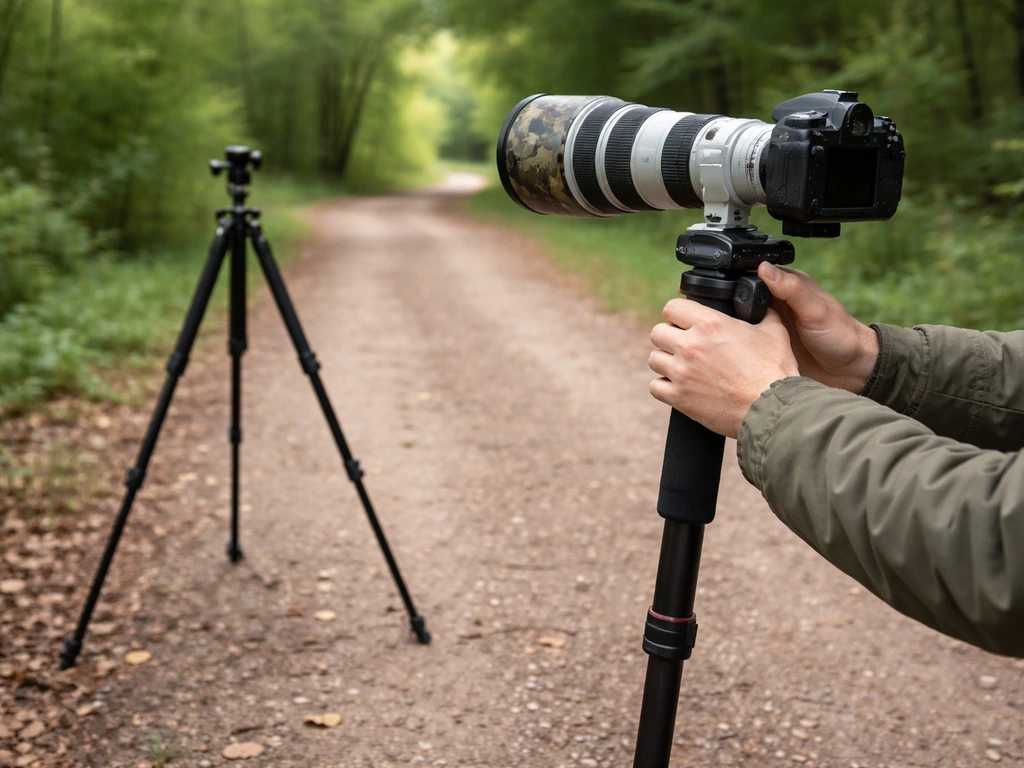
The head you attach matters as much as the monopod itself. There are three main options for bird photography: a ball head (quick and flexible but less controlled for tracking), a two-way tilt/monopod head (smooth tilt in one plane, good for perched birds), and a gimbal-style head. For birds in flight, a gimbal head is a genuine game-changer. The Wimberley MH-100 MonoGimbal is the reference standard here: it's smooth, heavy-duty, and makes panning a big telephoto lens feel almost effortless. The gimbal balances the lens at its center of gravity so it floats and follows the bird rather than constantly fighting gravity.
Quick release
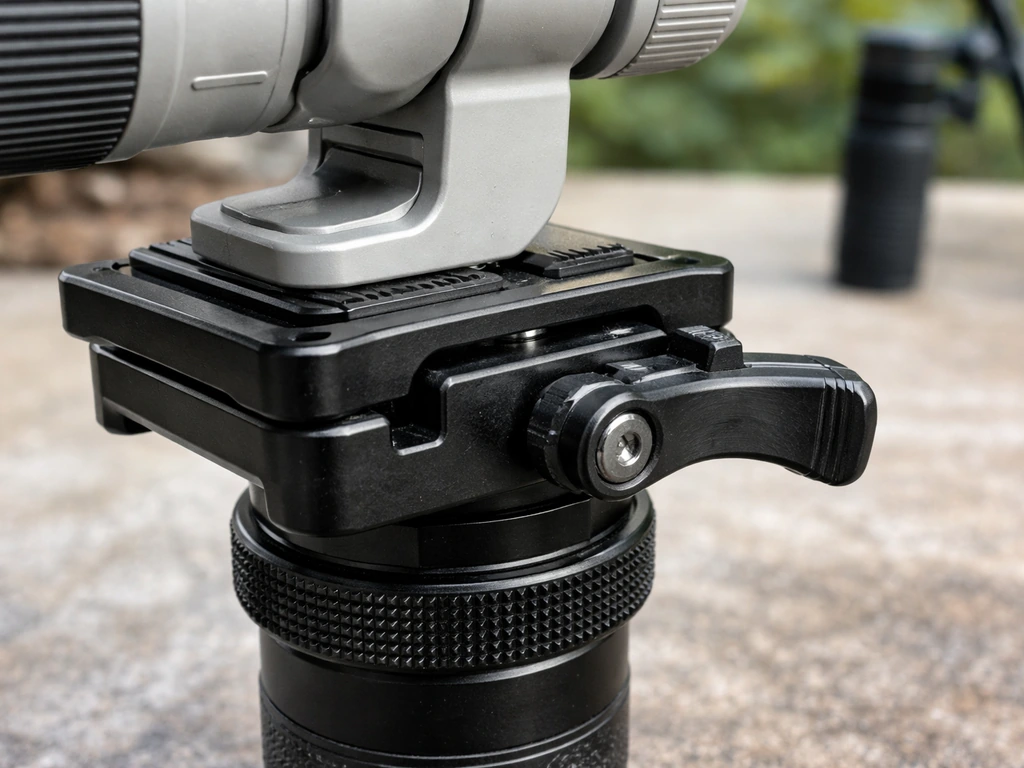
Stick to the Arca-Swiss standard. Almost every quality head, plate, and lens foot on the market uses it, so you can mix and match without adapter hassles. The Leofoto VH-20LR uses an Arca-compatible lever clamp. The Wimberley MH-100 mounts via a 3/8-16 threaded stud and accepts Arca-Swiss plates. Buy one good set of plates and they'll work across multiple heads and tripods.
Matching your monopod to how you actually shoot
| Shooting Scenario | What You Need | Head Pick |
|---|---|---|
| Perched birds, deliberate framing | Stable monopod, two-way tilt head, good height range | Leofoto VH-20 or similar tilt head |
| Birds in flight, fast panning | Lightweight carbon fiber, gimbal or fluid head, foldable feet | Wimberley MH-100 MonoGimbal |
| Hide or ground-level, low light | Low minimum height, wide tilt range, bean bag optional | Ball head or two-way tilt; supplement with bean bag |
| Travel / multi-day birding trips | Lightweight, compact when folded, durable leg locks | Carbon fiber, twist-lock legs, compact head |
For perched birds, your priorities are controlled framing and smooth small adjustments. A two-way tilt head lets you angle the camera up or down without disturbing the horizontal plane, which is exactly what you need when a warbler is at a slightly different height than expected. Stability here matters more than speed.
For birds in flight, speed and smooth panning are everything. A gimbal head means you can sweep a 500mm lens across the sky and the lens stays balanced even mid-swing. If you're shooting a tern diving or a hawk circling, a stiff ball head locked at the wrong angle will cost you every shot. In really windy conditions, sitting down and bracing the monopod base stabilizes things further.
For hide work or low-light shooting at dawn or dusk, you're more likely to be low to the ground, possibly seated, and shooting through a small window or gap in vegetation. A monopod with a low minimum height and a wide tilt range is essential here. A bean bag on top of the monopod foot can add extra stability on soft ground.
Top picks: best monopod for each type of bird photographer
Best overall: Leofoto MPQ-405C
The Leofoto MPQ-405C is my go-to recommendation for most bird photographers. It's a five-section carbon fiber monopod that reaches 72.8 inches, uses quick-disengage locks for fast extension, comes with a carry case, and works with the Arca-Swiss system throughout. It handles heavy telephoto rigs without flexing, and the price is well below Gitzo territory while delivering comparable performance for field use.
Best for maximum stability and tall shooters: Gitzo GM4552L
The Gitzo GM4552L is the premium pick. It uses Carbon eXact tubes in larger diameters than most competitors, and Gitzo claims rock-solid stability even at its full 190 cm (74.8 in) maximum height. If you're tall, regularly use a 600mm f/4 or bigger, and want the absolute best vibration damping available, this is the one. It's expensive, but it's also the kind of thing you buy once and use for a decade.
Best for versatility and low-angle shooting: Sirui SVM-145P
The Sirui SVM-145P is a smart option if you shoot a wide range of scenarios. It goes down to 77 cm (30.3 in) for ground-level work, supports up to 10 kg (22 lbs), and has a bubble level plus a 3/8-16 mount at the top so you can add any standard head. The three tiny foldable feet at the base let the column tilt 36 degrees, which is genuinely useful when you're shooting at an angle in the field. It's a modular, adaptable monopod that suits beginners who don't yet know exactly what they'll be shooting most.
Best head for birds in flight: Wimberley MH-100 MonoGimbal
The Wimberley MH-100 isn't a monopod, it's the head you put on top of one, but it deserves a separate callout because it makes such a big practical difference. It's a side-mount gimbal that balances even large telephoto lenses so they pivot freely and stay where you put them. The operation is described as very smooth and very heavy-duty, and it mounts via a 3/8-16 stud or QR clamp on any standard monopod. If tracking birds in flight is your main goal, pair any of the above monopods with this head.
Best budget tilt head: Leofoto VH-20
For perched bird work on a tighter budget, the Leofoto VH-20 monopod head is a solid performer. It's rated to 12 kg, uses an Arca-compatible clamp, and provides a clean +90 / -90 degree tilt range. It won't track flight the way a gimbal does, but for deliberate, composed shots of birds sitting still, it's more than adequate. For bird hunting, a suitable choke can help you control pellet spread and improve your hit rate on moving targets best choke for bird hunting.
How to actually use a monopod in the field
Setting up fast
Set your monopod height before you start walking toward a spot. Adjust it to just below eye level so the camera sits comfortably at your eye when you're standing upright. Twist-lock or quick-release leg sections are faster than flip-locks in cold or wet conditions when your hands are gloved. Once height is set, leave it there unless you sit down.
Planting and panning technique
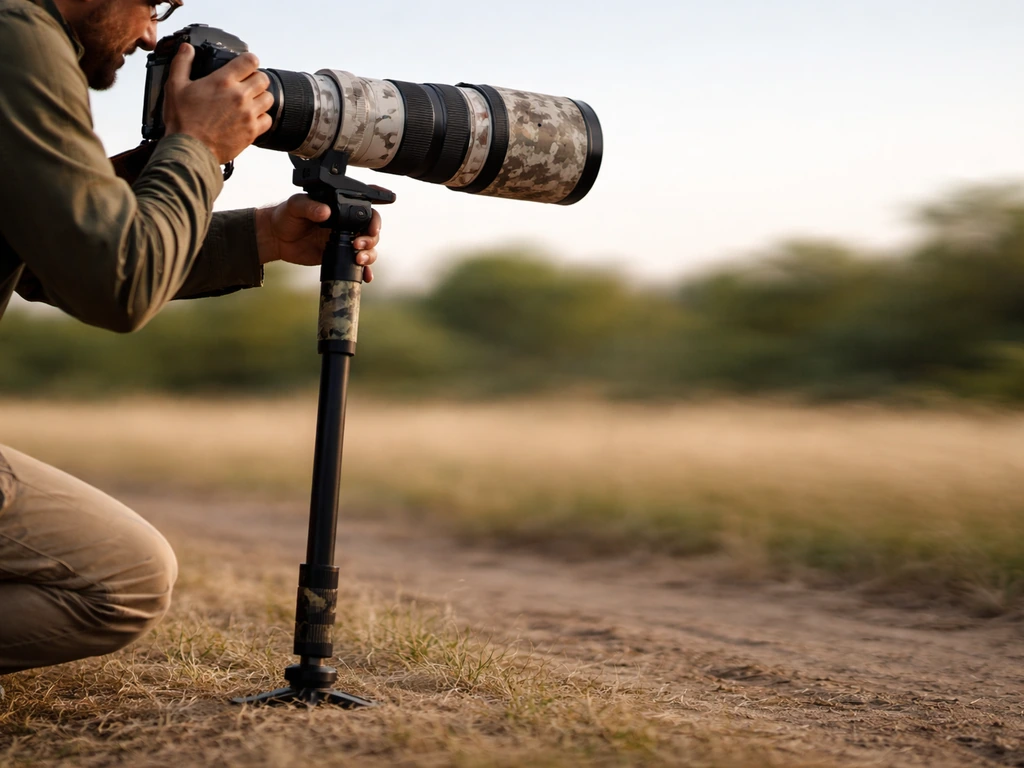
Plant the foot firmly but don't lean heavily on the monopod: let it support the lens weight, not your body weight. Keep your elbows slightly bent and close to your sides. To pan for a bird in flight, pivot from your hips while keeping the monopod foot as a stable anchor point. Think of the foot as a pivot rather than a prop.
The halfpod technique
One field trick worth knowing is the halfpod: retract the monopod shorter than usual and brace the foot against your midsection or a belt loop at waist height. This creates a third contact point (foot, hands, torso) that significantly steadies the rig when you're on the move or in a tight space. It's surprisingly effective for birds you're slowly walking toward and don't want to spook by fully setting up.
Reducing shake with long lenses
Vibration from nearby foot traffic, vehicles, or soft ground can ruin otherwise sharp images. If you're near a road or boardwalk, step off it before shooting. On windy days, shoot from a seated position and consider resting the monopod's base on a bean bag for extra damping. Avoid extending any center column: use the leg sections to reach height and lock the column down completely.
Walking between spots
Leave the monopod attached to the camera and partially retracted as you walk between locations. Detaching and reattaching wastes time and increases the chance of dropping something. Keep the lens cap off if you're actively birding: the few seconds it takes to remove it can mean missing a shot when a bird appears unexpectedly.
Mounting, heads, and lens compatibility
Almost all modern monopods use a 3/8-16 threaded top, which is the standard connection point for heads. If your head has a 1/4-20 screw, you'll need a simple adapter (they cost a few dollars and are widely available). The Wimberley MH-100 connects via 3/8-16 or a QR clamp. The Sirui SVM-145 has a 3/8-16 mount built in.
For long telephoto lenses, you almost always want to connect via the lens foot rather than the camera body. Most telephoto lenses (300mm and up) have a removable tripod collar and foot. Swap that foot for an Arca-Swiss compatible replacement (Kirk, RRS, and Acratech all make lens-specific plates), and your lens will balance properly on the monopod head instead of being front-heavy and awkward.
If you're using a shorter lens or a mirrorless body with a lighter setup, mounting via the camera's Arca plate works fine. Just make sure your plate is long enough to prevent front-heavy tipping. The Leofoto VH-20LR's lever clamp makes swapping between camera and lens plate fast, which matters when you're switching between two bodies in the field.
Practical buying checklist and beginner mistakes to avoid
- Calculate your total rig weight (camera + lens + head) before buying, and choose a monopod rated for at least 20% more.
- Pick carbon fiber over aluminum if you can stretch the budget: the weight saving matters on long days.
- Confirm the maximum usable height is at or above your eye level when standing.
- Check minimum height if you plan to shoot ground-nesting or hide-based birds.
- Choose your head before your monopod, not after: the head affects which monopod threads and sizing you need.
- Buy into the Arca-Swiss ecosystem from the start: one plate standard works across all your gear.
- Test leg locks in-store or on delivery: twist-locks should feel smooth and firm, not gritty or loose.
- Avoid extending any center column for bird photography: stability drops sharply.
The most common beginner mistake I see is buying a monopod rated at 5 kg and then using it with a 500mm lens and full-frame body that together weigh 4.8 kg. The monopod technically holds it, but at near-max payload the flex is real and your sharpness will suffer. The second most common mistake is skipping the lens foot plate and mounting via the camera body, which puts the balance point in the wrong place and makes panning a heavy lens exhausting. Fix both of those and you'll be ahead of most people who've been using monopods for years.
Maintenance, travel, and getting the most out of your monopod
Carbon fiber monopods need very little maintenance, but a few habits keep them working well. After shooting near saltwater or in sandy environments, wipe down the tubes with a damp cloth before retracting the sections. Sand inside the leg locks will wear them out over time. Every few months, open the leg sections fully, clean the threads or lock mechanisms with a dry brush, and check that the leg locks still feel tight. If a twist-lock starts to slip, most manufacturers sell replacement rubber lock collars cheaply.
For travel, the best approach is to retract the monopod fully and keep it attached to your camera bag's side straps or inside a padded carry tube. Loose monopods in overhead bins or car trunks get knocked around and the leg sections can crack at the joints. If you're flying, carbon fiber monopods typically pass through security without issues, but check your airline's policy on long items in carry-on bags: some flag anything over 60 cm.
To get the most out of your monopod over time, practice setting height quickly until it's automatic. The value of a monopod in the field is almost entirely speed: if it takes you 30 seconds to get to the right height and lock everything, you'll miss birds. Set it to your standard shooting height at home and mark the leg extension with a small piece of tape so you can reset it without measuring. Small habits like that are what turn a decent piece of gear into something you actually rely on.
If you're just getting started with photographing birds around the yard or garden and aren't ready for a full telephoto rig yet, a monopod may be overkill at first. But once you're regularly using a lens of 300mm or longer, the arm fatigue and shake reduction alone justify the cost of a good one.
It pairs well with other bird-watching gear: if you're already thinking about how to set up a feeding station or attract specific species, having a monopod ready means you can shoot the action the moment it starts without scrambling for support. When you’re setting up the best bird bait routine, the goal is to attract the right birds consistently so you can photograph them the moment they arrive a feeding station.
Many photographers use the best bird decoy ideas to bring in the same species consistently, so you can capture natural behavior on camera best bird bait routine. If you’re using a Bird Buddy, the next step is figuring out what size pole to get so the setup is stable and the camera can frame the action reliably feeding station or attract specific species.
If you're choosing the best pole for bird buddy, a monopod is often the quickest way to get stable shots without the hassle of fully setting up a tripod.
FAQ
Is a monopod worth it for birds at 200mm to 300mm, or do I really need one only for 500mm+ lenses?
A monopod starts paying off most clearly once your lens is tripod-collar equipped and you are shooting at least 300mm for extended periods. For 200mm, many people get enough stability by using a wrist strap, hand support, or a gimbal-like action in their monopod hands, rather than carrying a full monopod setup everywhere. If you plan to do long tracking walks or panning in the field, even a smaller lens can still benefit, but the “big fatigue reduction” effect is strongest with 500mm to 600mm class lenses.
What should I do if my telephoto lens does not have a removable tripod collar or lens foot?
If there is no tripod collar foot to swap, you typically mount through the camera plate instead, but you must account for front-heavy balance. Use a longer Arca plate on the camera, ensure the lens does not extend too far in front of the clamp, and consider adding a quick ballast or tightening your stance so the lens does not pull the rig forward. Also check whether your lens has factory tripod attachment points that can accept an Arca-compatible plate, sometimes via an alternative bracket.
How do I choose between a two-way tilt head and a gimbal if I shoot both perched birds and birds in flight?
If birds in flight is your priority, a gimbal head is usually the better “single system” choice because it maintains balance during panning. If perched birds dominate and you want easier, cheaper adjustments, a two-way tilt head can be the better daily driver. In mixed use, a common approach is one monopod plus a gimbal for flight trips, and a budget two-way tilt head for perched-focused outings, rather than trying to force one head to do everything equally well.
How high should I set the monopod, and what if I’m between two heights?
Set it so the camera sits comfortably at eye level when you are standing upright, then fine-tune with your stance instead of extending a center column. If you are between two heights, choose the taller option but avoid the center column and keep the leg sections locked at the closest practical extension. Hunching is usually a sign you extended too low, and over-extending is often worse because it increases wobble.
Should I always avoid the center column, even for quick shooting?
For sharpness, yes, you generally want to avoid center column extension. Use leg sections to reach height, then lock the column down completely. If you must raise quickly, extend only as much as needed, and expect reduced stability, especially with long lenses. If your model has a fixed, non-extendable center section, that is typically a stability advantage for birding.
What’s a practical way to prevent wobble when I’m shooting from soft ground or mud?
Resting the base on something compliant can help, such as a bean bag or a folded pad if you are in stable, safe terrain. On soft ground, keep the monopod base fully planted and reduce sideways force while panning, pivot from your hips rather than pushing the base around. If possible, step onto firmer edges like grass clumps or a boardwalk section only when it is steady, then brace your elbows close to your body.
How do I handle windy days when I still want to track birds in flight?
Wind changes everything for monopods. A seated position often improves control because you can brace the base more consistently and reduce your upper-body sway. Also consider lowering your shooting height slightly if it reduces sail-like exposure, and prioritize smooth hip-driven panning instead of arm-driven corrections. If your monopod supports angled feet, use that adjustability to keep the base more stable under side loads.
Can I use my monopod with a smaller ball head, or will it be too unstable for birds?
A ball head can work, especially for perched birds, because it provides fast framing. The limitation is that you can lose repeatable panning control and fine tracking, especially when the lens is heavy. If you use a ball head, pick one with good drag and locking stiffness, and avoid fully unlocking while tracking. For frequent flight work, a gimbal is the safer choice because it keeps the lens balanced through the entire pan.
What adapter issues should I watch for when my monopod uses 3/8-16 and my head uses 1/4-20?
Check the threaded stud sizes before buying or packing. If your head has 1/4-20 and the monopod is 3/8-16, you will need a proper adapter that fits securely on the monopod top and provides full thread engagement. Also verify that the adapter does not add extra length that could put the head and lens balance point too far forward.
How do I transport a monopod so it doesn’t get damaged during flights or road trips?
Retract fully and keep it secured in a padded carry tube or to dedicated bag straps, so the joints cannot take impact from shifting gear. Avoid letting it rattle loose in a car trunk or overhead bin. If you are flying, check your airline’s rules for long items in carry-on, and keep the center and leg locks protected from accidental extension.
How should I maintain carbon fiber monopods after shooting near saltwater or sand?
After saltwater or sandy conditions, wipe down the tubes before retracting, because grit trapped in the inner surfaces can damage the leg locks. Then open the sections fully and remove debris with a dry brush, not compressed air that can drive particles deeper. Periodically check that twist locks or collars still tighten firmly, and replace worn lock collars early rather than waiting for slippage.
What is the “halfpod” technique and when should I actually use it?
Halfpod means you retract the monopod to a shorter length and brace the foot against your torso or belt area, creating a third contact point besides your hands and the base. Use it when birds are nearby and you are walking or maneuvering in tight spaces, so you can react instantly without fully setting height. It is less useful when you need maximum clearance or when the ground is unstable enough that bracing against your body would transmit wobble.
What are the most common balance mistakes that cause exhaustion or blurry shots?
Two big ones are underestimating payload rating, and mounting through the camera body when your lens has a collar. Near the monopod’s maximum load, flex shows up as blur, especially with long exposures or low shutter speeds. Mounting via the camera instead of the lens foot often puts the balance point in the wrong place, forcing your hands and shoulders to fight the lever effect. Fixing both typically improves stability and tracking comfort immediately.