For most small birds in the 75–110g range (cockatiels, small conures, large parakeets), the Aviator Harness in Petite size is the closest thing to a gold-standard starting point. It uses welded construction instead of sewn seams, which matters for birds with sensitive skin, and its collar design is specifically engineered to reduce escape risk. That said, the "best" harness for your bird is the one that fits correctly and that your bird has been gradually trained to accept. A $60 harness forced onto a panicked cockatiel is far worse than a simpler option introduced properly over two weeks.
Best Small Bird Harness: Fit Guide and Safe Training Tips

Marcus Chen
10 Jun 2026
What to look for in a small-bird harness
Small birds have delicate skeletal structures, thin skin, and respiratory systems that are uniquely sensitive to pressure and stress. A harness that's just slightly too tight can restrict breathing; one that's too loose is an escape waiting to happen. Here's what actually matters when you're evaluating options:
- Material: Look for soft, high-quality woven nylon that won't abrade skin or catch feathers. Avoid anything stiff, plasticky, or with raw edges near the body.
- Construction: Welded or heat-fused connection points are more reliable than sewn ones for fine strap widths. Sewn harnesses can have thread that frays and catches toes or feathers over time.
- Collar design: The neck/chest collar should sit flush against the chest without gapping. Gapping is how toes get caught and how birds slip out.
- Adjustability: Small birds vary in body shape even within the same species. A harness with some adjustment range is more forgiving than a rigid fixed size.
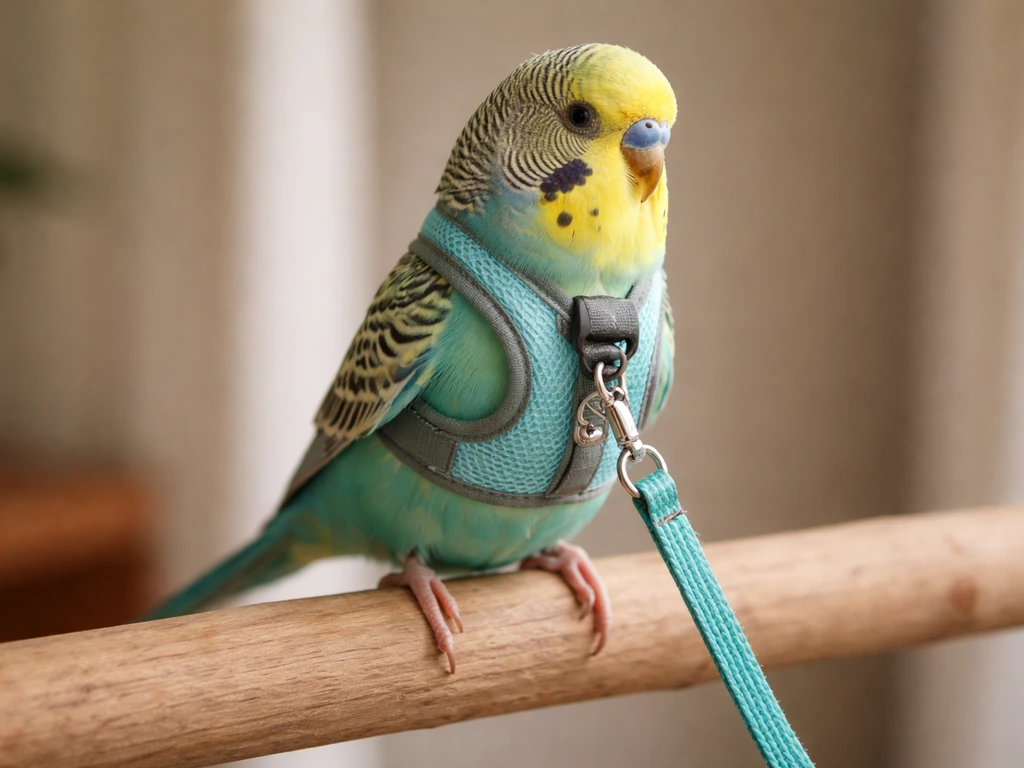
- Leash attachment point: Should be on the back, centered, so the bird can perch and move without the leash pulling at an awkward angle.
- No loose loops or dangling hardware: Any loop, buckle, or ring your bird can bite, hook a toe into, or get tangled around is a hazard.
One thing I'd flag for new owners: avoid any harness that claims to fit a huge weight range with a single size. Birds of the same weight can have very different chest widths and back lengths depending on species. A harness built for a 90g cockatiel's flat, wide chest may sit completely wrong on a 90g conure with a rounder, more compact torso.
Choosing the right harness style for your bird
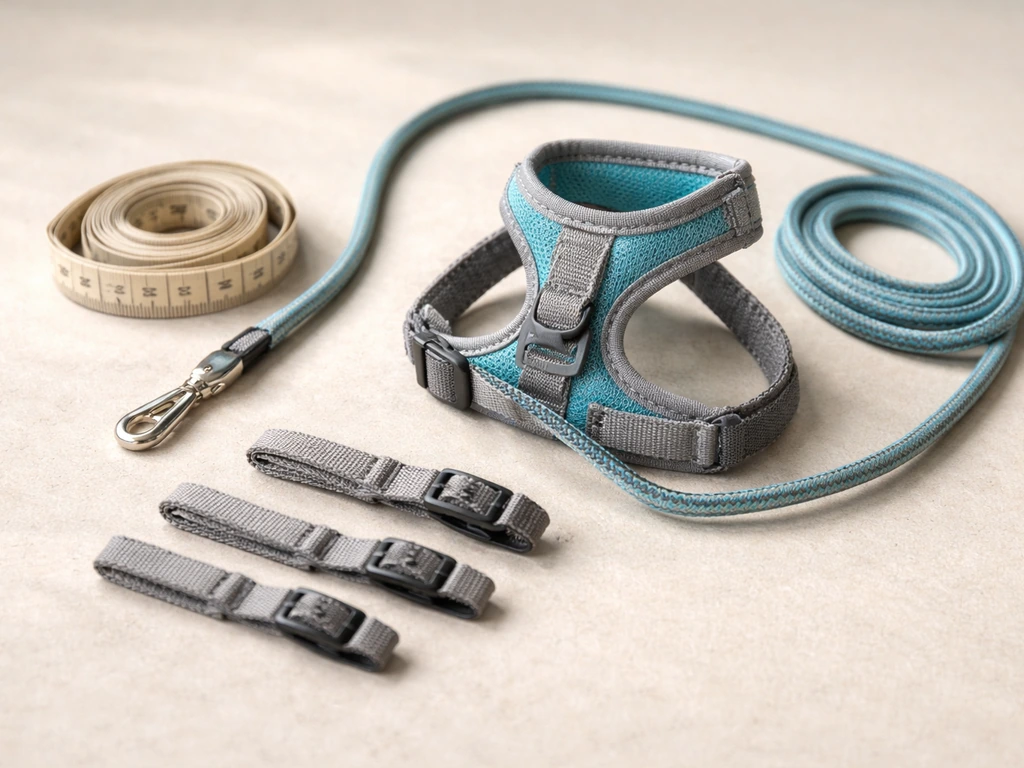
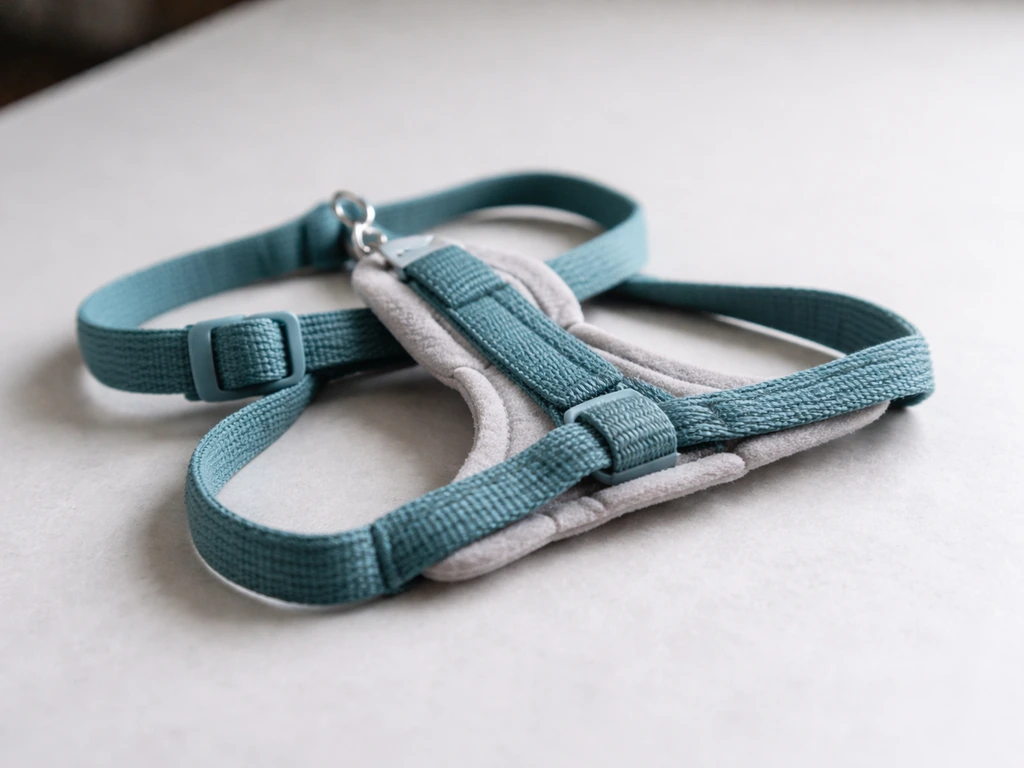
There are two main harness styles you'll run into: H-style strap harnesses and wrap/vest-style harnesses. They fit differently and suit different birds and owners.
| Style | How it fits | Best for | Watch out for |
|---|---|---|---|
| H-style / strap | Two loops (chest and body) connected by a back strap; sits close to the body | Cockatiels, conures, parakeets; birds that tolerate having a loop slipped over their head | Toe-catching if collar gaps; requires precise sizing; some birds resist head-loop entry |
| Wrap / vest | Fabric panel wraps around the chest and body like a jacket; often fastens at the back | Birds with feather plucking issues or sensitive skin; birds that panic at strap loops | Can trap heat; harder to check fit visually; less common in quality versions for very small birds |
For most small parrots, the H-style strap design (like the Aviator) is what you'll find in the most reputable options and is what avian vets and experienced trainers most commonly reference. The vest style is worth considering if your bird has had feather damage or skin sensitivity, but I'd check with an avian vet first since the fit assessment is less straightforward. If you're also comparing full vest products, there are dedicated bird vest options worth a separate look. If you want the best bird vest, focus on a secure, correctly sized fit for your bird's chest and skin sensitivity vest style harness.
How to measure and size your small bird at home
Sizing a harness from weight alone is a rough starting point, not a final answer. The Aviator Petite is listed for birds roughly 75–110g, which covers most cockatiels, small conures, and larger parakeets. But you still need to verify the fit on your specific bird's body shape. The Aviator describes its strap material as “high quality woven nylon strap material” and also provides fit and exchange guidance if the harness doesn't fit your bird The Aviator Harness. Here's how to do it step by step.
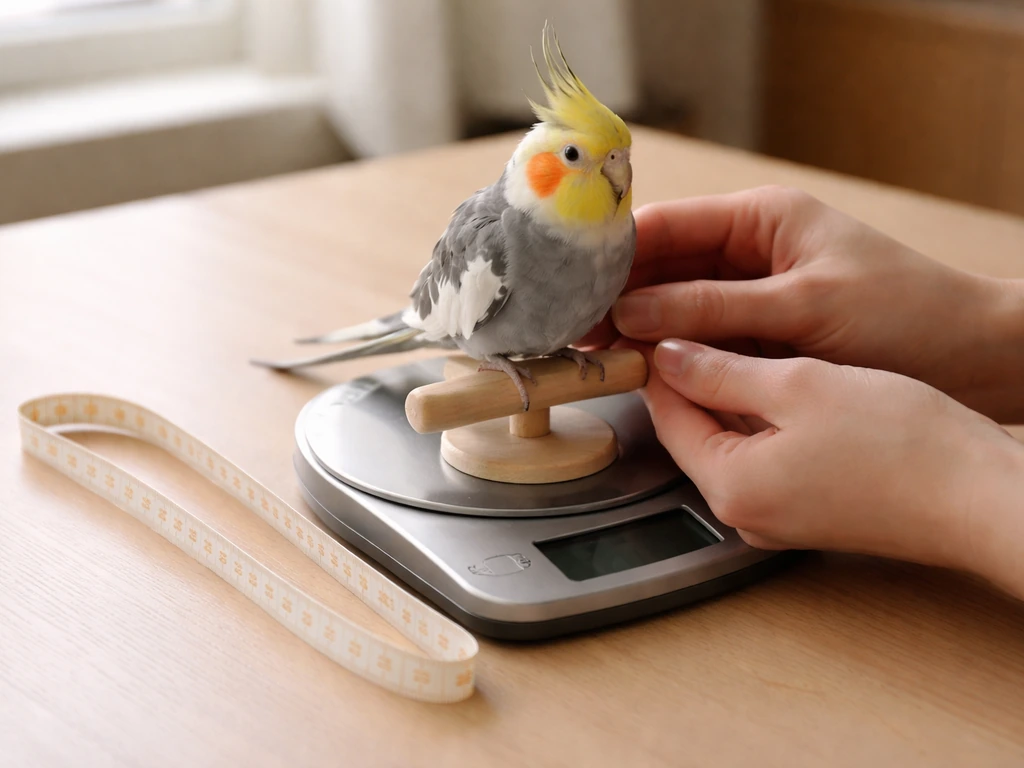
- Weigh your bird: Use a kitchen scale with a perch or small cup on top. Weigh early in the morning before the first meal for consistency. Record the weight in grams.
- Match weight to manufacturer size chart: Use the brand's official sizing chart, not a retailer's guess. For the Aviator, Petite covers 75–110g; the next size up (Small) is for birds over 110g.
- Check chest girth: Once you have the harness in hand, hold the chest loop open gently and see if it would wrap around your bird's chest just behind the wings. You're looking for about a finger's width of clearance, not a loose, floppy gap.
- Check neck/collar loop: The collar portion should lie flat against the chest when the bird is standing normally. If it gaps away from the chest, size down or try a different brand.
- Test back strap length: With the collar and body loops in rough position, the connecting back strap should run cleanly along the bird's back without pulling either loop upward or pushing them apart.
- Do a fit check before the first outdoor use: Put the harness on your bird (after training, not before) and check that you can slide one fingertip under the chest loop without forcing it, but cannot slide two fingers in comfortably. If you can fit two fingers easily, it's too loose and an escape risk.
If the harness you ordered doesn't fit after going through these steps, exchange it before you start training. Trying to train a bird in an ill-fitting harness teaches them the harness is uncomfortable, which makes everything harder later. Most reputable brands, including the Aviator, have exchange processes for fit issues.
Training your small bird to accept the harness
This is the part most first-timers rush, and it's where most harness training fails. You cannot put a harness on a bird that hasn't been introduced to it gradually. A bird that's been forced into a harness will associate it with panic, and you'll have a much harder time getting them to accept it later. The whole process is built on small steps and positive reinforcement. If you're comparing options, aim for the best bird harness that matches your bird's body shape and training level rather than just the weight rating.
Keep sessions short and calm
For small birds, training sessions should be kept to about 2–5 minutes, especially in the early stages. Some sources suggest up to 15 minutes for established behaviors, but for a new and potentially stressful stimulus like a harness, shorter is better. End every session before your bird shows frustration, feather-ruffling, or attempts to flee. Always finish on a positive note, even if that means ending the session after a single successful small step.
Step-by-step desensitization
- Day 1–3: Place the harness near the cage or training area so your bird can see and investigate it. Reward calm behavior near it with their favorite treat.
- Day 3–5: Hold the harness in your hand during handling sessions. Let your bird touch it, chew it gently, or inspect it. Keep rewarding calm curiosity.
- Day 5–7: Gently touch the harness to your bird's chest and back without attempting to put it on. Reward immediately after each brief contact.
- Day 7–10: Practice guiding your bird's head toward the collar loop opening. Use target training (a target stick or your finger) to encourage them to move their head forward voluntarily. Do not push their head through.
- Day 10–14: Slip the collar loop over your bird's head for just a second, then remove it and reward heavily. Gradually increase how long it stays on.
- Day 14+: Work toward getting the full harness on, then off, calmly. Once your bird tolerates the full harness for several minutes without distress, you can begin supervised indoor sessions before moving outdoors.
Use a clicker or a consistent verbal marker paired with treats to reinforce each successful step. Positive reinforcement, not restraint, is what actually builds a bird's willingness to cooperate with handling. If your bird is too stressed to take treats during a session, that's a clear sign the session is too intense and you need to go back a step.
Safety checks and fit troubleshooting
Once your bird is wearing the harness, the job isn't done. You need to do a quick safety check every single time you put it on, not just the first few times. Here's what to look for and how to fix common problems.
| Problem | What it looks like | Fix |
|---|---|---|
| Toe catching | Bird's toe gets hooked in the collar loop | Collar isn't sitting flush to chest; adjust fit or try smaller size |
| Breathing changes | Rapid tail-bobbing, open-mouth breathing, labored movement | Harness is too tight; remove immediately and reassess size |
| Red marks or feather damage | Bare patches, redness, or abraded skin after removal | Material or fit issue; check for rough edges, try a different size or brand |
| Escape attempts succeeding | Bird slips out during movement | Too loose, especially at collar; size down or try a brand with better collar design |
| Wing restriction | Bird can't extend wings naturally or flaps awkwardly | Body strap is too tight or positioned too far forward; adjust or resize |
| Neck/head discomfort | Bird constantly scratching at collar, shaking head | Collar loop may be too small or sitting on feathers wrong; check fit and collar position |
Never leave a harness on an unsupervised bird. It should go on immediately before an outing and come off as soon as you're back inside. Wearing a harness for extended periods raises the risk of the bird catching a toe, getting tangled, or developing pressure sores. Think of it like a seatbelt: useful in the right context, not something you wear around the house all day.
Using the harness outdoors: leash handling, carriers, and environmental risks
Getting outdoors with your bird is genuinely rewarding once you've done the groundwork, but the outdoor environment introduces risks that don't exist at home. Here's how to handle them practically.
Leash handling basics
Keep the leash short enough that your bird can't build up swing speed if they fly or fall. A long leash that lets your bird fall several feet before catching can cause serious injury. The leash should be freely movable and must not be able to snag on anything, including your clothing, buttons, or furniture. Hold the leash loosely in your hand rather than wrapping it around your wrist or fingers, so you can release tension quickly if your bird panics. If you are shopping for the best bird leash, prioritize a length and clip system that lets you control tension quickly and keep your bird safe. Never tie the leash to a fixed object and walk away.
Pairing the harness with a carrier
A harness and a carrier aren't competing options, they're complementary. Use a carrier for transport to your outdoor destination, then switch to the harness once you're in a safe, controlled outdoor space. This reduces the time your bird spends harnessed and gives them a secure retreat if they become overwhelmed. If your bird is particularly anxious or has any health issues, an avian vet can help you decide whether a carrier alone might be safer than harness outings for now.
Weather, timing, and air quality
Birds are sensitive to temperature extremes in both directions. Avoid midday heat in summer, and don't take your bird out in cold, wet, or windy conditions. UMN Extension explains that heat stress happens when a bird's core temperature rises because it cannot lose enough heat or cope, which is why you should prevent overheating during outings heat stress happens when a bird's core temperature rises when it cannot lose enough heat. Skip outings near lawn equipment, fireworks, or crowded noisy environments since these are both startling and potentially dangerous if your bird panics and fights the harness.
Air quality is something bird owners often underestimate outdoors. Birds have highly efficient respiratory systems that make them far more vulnerable to airborne toxins than humans. Avoid areas with visible smoke, heavy vehicle exhaust, pesticide application, or chemical fumes. This isn't just an outdoor concern: at home, PTFE (Teflon) fumes from overheated non-stick cookware, aerosol sprays, perfumes, and scented candles can all cause rapid and sometimes fatal respiratory distress in birds. Keep this in mind when planning your route and when thinking about what's in the air wherever you're heading.
What to look for when buying: features that matter for beginners
Here's a practical buying checklist based on what actually separates useful harnesses from frustrating ones for new owners:
- Published species-specific sizing guidance, not just a weight range alone
- Welded or reinforced connection points rather than only sewn seams
- Soft, skin-safe woven nylon with no rough edges or exposed hardware near the body
- A collar/chest loop designed to sit flush against the chest to reduce toe-catching and escape
- An exchange or return policy in case the fit is wrong (this matters more than people think)
- Leash included or compatible with standard small-bird leash attachments
- Reputable brand with a track record in the avian community, not an unbranded generic import
If you're considering a harness for a cockatiel specifically, or for a conure, the sizing and fit considerations are slightly different enough that species-specific guidance is worth reading before you buy. If you're wondering what counts as the best bird harness for conure owners, focus first on the fit and training process described in this guide. The same applies if you're choosing between a harness and a full leash setup for outdoor use.
Common mistakes and when to skip harness training
Most harness problems I've seen come down to a handful of mistakes. Here's what to avoid:
- Buying based on looks or price alone without checking species-specific sizing
- Forcing the harness on a bird that hasn't been trained to accept it
- Skipping the collar fit check, which is where most escape and toe-catching incidents start
- Leaving the harness on for hours or unsupervised
- Jumping to outdoor use before the bird is calm wearing the harness indoors
- Choosing a harness that's too large thinking it gives the bird more freedom (it just makes escape easier)
- Ignoring early stress signals like feather-ruffling, wing-drooping, or refusal to take treats
When harness training isn't the right move
Not every bird is a good candidate for harness training, at least not right now. If your bird has a history of respiratory problems, is currently molting heavily, is very young and still being weaned, has unresolved feather-damaging behavior, or is significantly overweight, talk to an avian vet before starting. Obesity, weakness, or breathing issues can make the physical process of wearing a harness genuinely risky.
Some birds also have temperaments or trauma histories that make harness training too stressful to be worth pursuing. In those cases, a well-fitted carrier is a safer and kinder way to take your bird outside. When you need a break from harness time, the best bird carriers help keep transport secure and less stressful.
If you're on the fence, a quick consultation with an avian vet before you start is never a bad idea. They can assess your bird's body condition, flag any contraindications, and often give you practical hands-on advice for your specific bird that no article can fully replace.
FAQ
How tight should the best small bird harness be on my bird?
A “snug” harness should still allow normal breathing movement. After fastening, check that you can slide two fingers under the harness without forcing them, and watch the keel area for any restricted rise. If you see rapid tail bobbing, open-mouth breathing, or the bird immediately flares and tries to escape, remove it and retry with a different size or style rather than pushing through training.
What should I do if my bird panics during harness training?
Start with short, predictable sessions at the same time of day, and build only one new step per day (for example, touch the harness, then briefly hold it on, then remove before the bird resists). If your bird will not take treats while the harness is present, the problem is usually the step is too advanced, not the harness itself, so go back one stage and repeat until the behavior is calm.
Can I train a harness during molting or feather damage?
Yes, but only if you adjust the training timeline. First confirm the harness fits in its current condition, then add time gradually after the bird is stable. During heavy molting or skin irritation, prioritize a vest style only after an avian vet check, since rubbed feathers and sensitive skin can make pressure points worse than with an H-style strap.
Do I need to change the harness size as my bird grows?
Never assume weight is enough when the bird is growing or changing shape. Measure your bird’s chest width and back length periodically, especially for juveniles, and treat size changes as normal. If your bird can slip the harness, shows chafing, or the collar rides up toward the face, stop and exchange the harness even if the weight range still “matches.”
What if the harness keeps sliding or my bird can wriggle out?
In most cases, you should not correct fit problems with force. If a strap loosens, repositions, or the bird can back out, switch to the correct size or the correct harness style (H-style versus wrap/vest) rather than tightening further. Tightening past comfort increases the chance of breathing restriction and skin rubbing, which can set back training.
When should I use a carrier instead of a harness for outdoor time?
A carrier-first approach is often safer when your bird is new to outings, unwell, or easily spooked. Use the carrier for transport, then only move to harness use in a controlled, quiet outdoor space after the bird is calm indoors. If your bird cannot remain calm in the carrier without respiratory strain, postpone harness outings and get avian guidance.
How do I know if my harness sessions are too intense?
If your bird stops accepting treats when the harness is on, it is a clear intensity problem. Reduce the session length to 30 to 60 seconds for that step, end before feather ruffling or fleeing, then repeat later. Also check that no part pinches or rubs, because “stress” and “pain” can look similar early on.
What are the most common leash mistakes that cause injuries?
During outdoor use, always keep the leash position under control so it cannot tangle on clothing, buttons, or nearby obstacles. Avoid letting it drag, and hold it loosely so you can immediately reduce tension if the bird panics. Do not attach the leash to anything fixed, because a sudden bolt can create leverage pressure on the harness.
When is it unsafe to keep using a harness and I should see a vet?
Stop using the harness and contact an avian vet if you notice any skin rawness that persists, labored breathing, persistent coughing, loss of balance, or behavioral changes that continue after you remove the harness. For birds with known respiratory history, even brief pressure or stress can worsen breathing, so err on the side of medical advice before restarting training.
Next Article
Best Bird Leash: How to Choose, Fit, and Train Safely
Choose, fit, and train with the best bird leash safely: escape-proof harness, sizing tips, training steps, and maintenan